Assignment #11 tested how much I had remembered from the first marking period. I had chosen to do the glass text effect because it was the most interesting compared to the plastic and crazy text effect. Drop and inner shadwon was used to the glass text affect, with an opacity of 75% and 50% which gives it that transparent features. Afterwards I simply used pictures to show where and what was occuring on pajama day.
*******************************
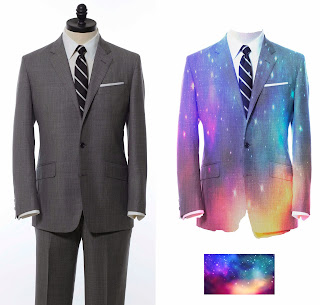
12: Adding texture through layers
In this project we were able to choose the texture we had wanted our jacket to be. For my jacket I had gone along with a galaxy texture due to its uniq colors that can match with anything. After clipping the layers we were also able to play with the opacity. Allowing for the colors to be more or less intense.
*******************************
13. Change one thing Poster
I took a Mcdonald`s Big mac, and I managed to switch up the logos on the container box. By transforming the Big mac into a salad, Also I switched up the "Big Mac" logo and inserted a food pyramid that introduces healthy foods to the public.
*********************************************
In this assignment magic wand was used to make the face on the pumkin. Almost every feature of the pumkin had been photoshoped. including the branch was given a green texture to. In order to give a scary glowing affect, stroke was used in blend mode and overlay. Lastly so now one could use our work as their own, the horizintal type tool was used and changes were made in the character panel.
***************************************
15 A. Creating a "painting" look via Displacemnt
This assignment had been very intresting to me before because I have personally seen pictures outside in the real world. Through the software photoshop we had use the move tool to put a brick wall and a flag together. That was the simple part, aftewards Filter Blur Gaussion Blur was set to 1.0 px. And lastly the opacity was set to the level we had desired.
***********************************
16. Smart Filtering with Motion Blur
This assignment required skills that everyone should know because it can also be used to edit a picture of someone. This picture had the unique affect that could be used for all sorts of pictures. By adding multiple fliters on top of each other, the resulting affect come out very diffrently. Motion blur was used to disguise this image as if the car had been moving. Then using the brush we tools were able to choose what we wanted from the original picture.
*****************************************
17. Quick masking to add a desiring affect
In this assignment, we werw able to mask the sections we wanted to enhance. In this picture, I had actually make the womens teeth darker, since her teeth had been quiet white in the beginning. The skills learned in this project can be used to edit any sorts of "selfies". Brush tool to red translucent mask was used to be able to tell what exactly we were going to work on. Afterwards by panting over we gave it an affect and to finally we inversed it, after going any areas we had brushed by mistake.
*******************************************
18. Soft filtering skin tones
By using smart filters and gaussion blur we were able to blur the image to our desire. Using the radius slider we could make the image very light. In order to keep the eyes focused and not blurry the brush picker was used. Afterwards we painted over the features and finally the soft focus was applied to the overall portrait.
*********************************************
19. How To Create A Realistic Pendrive in Adobe Illustrator
This is the first assignment in which we had used a diffrent software in multimedia. Adobe illustrator was used to construct a flash drive. We had repeatedly made rectangles and centered. The elipse tool was also used. By using the gradient feature we managed to give the usb a aluminum realistic usb, more stoppers were used to add more shades.
*********************************************
20. Adobe illustrator Wirless phone
 The phone itself was constructed of rectangles, and elipises. The shapes were then made more realistic through the effects we had put on these objects. We stylize many of the shapes to give it round edges and also the gradient feature played a key role on the appeareance between the shades. Shapes were placed on top of each other to give a 3D affect. We had learned to make icons such as message box through text which was very interesting.


